


Remote Access
Access your remote desktop from any device, anywhere.

 File Transfer
 Multi-Monitor Support
 Unattended Access
 Privacy Mode

Struggling to transmit large files via Outlook without hitting the file size limit? This article is your guide on navigating the complexities of how to send a large file through Outlook. In this guide, we'll walk you through 3 reliable methods tailored to bypass Outlook's conventional attachment restrictions.
From leveraging cloud storage solutions to compressing files without compromising quality, each method is designed to suit varying file types and sizes. We will also introduce an innovative alternative that promises smooth sharing and navigating the constraints of traditional email attachments.
Before exploring how to send large files via Outlook, it is necessary to understand the limitations inherent in its file transfer capabilities. Like numerous other email platforms, Outlook enforces particular limitations on the size of attachments permissible for sending or receiving. Typically, for most email accounts, the attachment size cap for Outlook can vary between 10 MB and 20 MB, which suffices for regular document sharing.
However, it becomes difficult to send larger files such as high-resolution images, huge videos, or presentations. These limitations can pose challenges, leading to bounced emails, failed transfers, or the need to seek alternative methods for sharing larger files. Understanding these boundaries is the first step toward finding effective workarounds to ensure successful file transmission via Outlook.
When challenged with the hurdle of how to send a large file via Outlook, there are several effective methods to bypass the attachment size restrictions. Here, we'll explore three reliable techniques and an innovative alternative to facilitate the smooth transmission of sizable files:
Compressing files before sending them via Outlook is a practical method to overcome attachment size limitations. Attempting to compress files already in compressed formats like MP3, JPG, or MP4 generally won't significantly decrease their file size. This approach is more effective when applied to uncompressed files such as sizable documents, uncompressed videos, and images saved in RAW format.
Both Windows and Mac offer built-in tools that allow you to compress files. You can also use a dedicated compressing tool such as WinZip or WinRAR. If searching for how I can send large files through Outlook by compressing them, follow the below-given steps:
Step 1. Begin by downloading and installing WinRAR from its official site on your computer. Launch this tool and navigate to the files you want to compress. After selecting the files or folder, perform a right-click and then opt for the "Add files to archive" option from the dropdown menu.

Step 2. It will lead you to the “Archive Name and Parameters” window, where you set the “Archive Name," select the "Archive Format," usually ZIP or RAR, and verify the size of the compressed file. Afterward, press the "OK" button, and ideally, the compression should reduce the overall file size, making it within the allowable limit for attachment in Outlook.

Step 3. Open Outlook on your browser and click "Sign In." Press the "New Mail" button at the top-left side to compose an email. Following this, hit the "Attachment" icon, choose the "Browse this Computer" option, and select the compressed file you created. Select "Attach as a Copy" if any pop-up appears, and ensure the file is properly attached before sending the email. Afterward, enter the recipient's email address to send the file to the targeted person by pressing the “Send” button.

Utilizing OneDrive within Outlook proves to be an effective method to evade constraints on attachment size while sharing hefty files. With a no-cost Microsoft account, you obtain 5 GB of complimentary OneDrive storage. Opting for a Microsoft 365 subscription provides an expansive 1 TB storage capacity, enabling the upload of files as large as 250 GB. Below is a detailed guide outlining the process of how to send a large file through Outlook using OneDrive:
Step 1. Use a web browser on your computer to access OneDrive. Here, login using your Microsoft account, click "Upload" and choose to upload “Files” or “Folder.” Now browse the file you want to send and upload it to the OneDrive.

Step 2. After the files are completely uploaded, select them and press the "Share" option in the top bar. Next, manage the access to these files as needed and press the "Copy," followed by the "Copy" button again to get a link to these files.

Step 3. Open Outlook and create a “New Email.” In the body of the email, paste the shareable link generated from OneDrive. Ensure all necessary details and instructions are included in the email, then press the "Send” button to the intended recipient.

Reducing the size of images before sending them through Outlook is a practical solution. This is especially true when dealing with large image files that surpass attachment size limits. You can use many offline and online tools to reduce the image sizes. Here's a step-by-step guide on how to send a large file via Outlook by reducing the size of the images:
Step 1. Open a web browser and access the website of "ILoveIMG," an online image resizer tool. Here, click "Select images" and choose the targeted images to upload them.

Step 2. In the right-side panel, under the "Resize Options" section, choose to reduce image size "By pixels" or "By percentage." Once selected, press the "Resize Images" button to get the results and save the files on your system.

Step 3. Now access Outlook using your device, and press the “New Mail” button. Moving on, click the “Attachment” icon and select “Browse this Computer” option. Now, select the ZIP folder of resized images and attach it. Now, type the recipient’s mail and hit the “Send” button to complete the process.

Avica Remote Desktop emerges as a powerful tool for smooth and swift file transfers between computers. It offers a patented protocol for lightning-fast transfers, boasting speeds 100 times faster than traditional FTP/HTTP methods. Moreover, users can use this feature in both the Free and Pro versions. With the ability to transfer an unlimited number and size of files, Avica redefines the file-sharing experience.
Additionally, Avica facilitates the creation of multiple virtual screens on the remote device, providing extra displays as needed. Moreover, it supports external graphics tablets, ensuring responsiveness to pressure and levelness, thus enhancing the remote experience for creative tasks. Gamers can rejoice as Avica allows the concurrent connection of up to four game controllers.
Feel free to download Avica products by clicking the button below. If you're seeking additional information about Avica product downloads, you can visit the Avica download page. Rest assured, Avica guarantees the safety and virus-free nature of all products obtained from the official website or app store.
Avica, with its 100x faster transfer protocol, makes sending large files a breeze. Here is how to send large files through Avica:
Begin by downloading and installing Avica. After installation, access it and log in using your respective Avica account.

On the remote device, be sure to switch on the "Allow remote access to this device via your credentials'' switch. Make a note of the "Avica ID" and "Password" given for the specific device you're targeting.
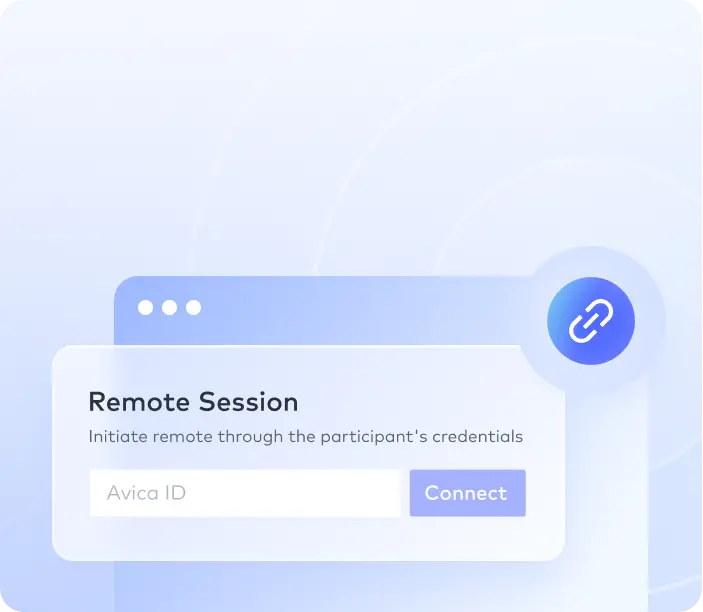
Proceed to the local device and access the "Remote Session" section. Here, input the remote device's specific "Avica ID" and select "Connect." When asked to input the "Password" associated with the remote device, enter the accurate password. After establishing a connection, your goal is to transfer large files between two computers.

Now, browse to the targeted files on the remote computer. Once you have accessed the files, you can simply drag and drop the files to the local device. Otherwise, you can right-click the selected files, select “Copy," and paste these files into the desired location on the local device to complete the transfer. You can also use the File Transfer feature of the toolbar on the top of the interface.

Another option you can opt for is to use the "File Transfer" feature. It can be accessed from various locations, including the “file transfer” icon from the top right corner and tapping the “three lines” icon within the remote connection. Moreover, you can also access it from your recent connections.

After selecting the option, access the respective directories, choose the files, and tap "Send" to complete the process.

In conclusion, when it comes to how to send a large file through Outlook, overcoming email attachment limits demands innovative solutions. Many options exist to effortlessly send large files, from compressing files to utilizing cloud storage and employing Avica's high-speed transfer. It empowers users to transcend the boundaries of traditional file transfer constraints in Outlook.
With numerous techniques at hand, navigating file size limitations has become a thing of the past, enabling hassle-free transmission of large files. Moreover, we recommend Avica to make your file transfer process easier and even control the remote desktop without any physical presence.

Connect Everything, Work Anywhere


